How can I add my company's logo to templates and outgoing signing or review emails?
Learn how to add your company logo to contracts generated from templates, and to your signing/review request emails
Adding your logo to a template means that all contracts generated from the template will have the logo displayed. To set up your company logo in Precisely, follow these steps:
Step 1: Importing your logo
An admin of your organization can import your logo:
-
Click your organization’s name in the top right corner and choose Organization settings,
-
Click the blue Add logo button under Logo settings and choose a valid .png file to import
-
Select the position where the logo should appear in headers of your contracts.

Step 2: Applying your logo to a template
To apply the logo to a template, simply
-
Click Templates in the top menu and select the appropriate template,
-
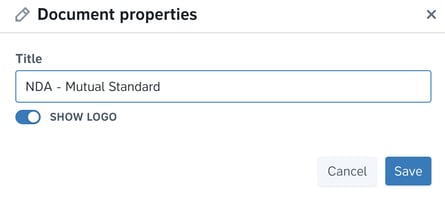
Click the options button (the three dots) to the right of the document(s) that should include the logo and choose Rename,
-
Activate the Show logo switch and click the blue Save button.


When the switch is enabled, the logo will appear on the document(s) each time you generate a contract from the template.
Please note: Your logo will not be visible in the Precisely platform when projects are generated from the template. But don't worry - it is visible when signing parties open the document from their email link to sign the agreement. The logo is also visible in the completed, signed PDF file.
 The above image shows an example of what a logo looks like in the header of a document sent for signing.
P.S: We support logos in .PNG format with a maximum file size of 256kb.